|
Should I use blue or green screen?
The choice of whether to use
a blue screen or a green screen depends mainly on the subject you are
shooting. What is important is that the subject contain as little
of the screen's color as possible. If your subject has green
eyes, use a blue screen. If she has blue hair, use a green screen.
Another color consideration is to use the color which most closely
matches your background color. For example, if you will be
compositing against a blue/gray image of sky and clouds, then use a
blue screen. If your background will be a forest, use a green
screen. What this does is minimize the impact of possible blue or
green edges around your subject due to a less than ideal mask.
Why does my composite look blocky sometimes?
Because the DV standard
(which iMovie uses) was never meant for doing special effects work.
Blue screen compositing relies entirely on the color of each pixel to
determine where the edge between the subject and the background is.
Since the DV standard is a compressed format, each pixel has a
brightness value, but color information is stored only at every fourth
pixel. What this means is that every four pixels in a row have the same
color (with different brightnesses). While the human eye may not
notice the compression artifacts, these pixels look the same to the
blue screen.
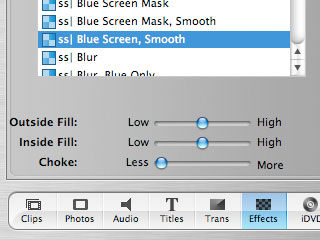
This makes it challenging to come up with good clean edges for the
extracted mask. The "Smooth" effects in this plugin attempt to
compensate for this, but there will always be cases where it is very
difficult to extract a clean mask. This is why there are two blue
and two green screen effects in the "Masks & Compositing"
plugin. The plain effects are faster, while the "Smooth" ones
take more time to soften the edges of the mask.
How can I make a blue screen?
You can buy commercial blue
screens, but if you're spending that kind of money, you should be using
an expensive professional video post production system as well.
For the rest of us, any flat surface will do surprisingly well.
The exact shade of blue is not crusial; the important thing is that the
screen provide a uniform blue
color. A cloth backdrop, painted wall or sheet of foam core or
cardboard, or even a nice blue sky will do. Dirt, discolorations,
folds, wrinkles, shadows and the like will present problems, so make
sure you take time and iron the cloth and tape it down so it is nice
and flat.
What should I look out for when setting up
a blue screen shot?
Some subjects are better
suited to blue screen than others. In general, subjects with
well-defined outlines will be easier to extract a mask from, while
furry subjects or subjects with loose hair flying around in all
directions will prove to be a challenge when it comes to extracting a
mask. As mentioned before, the color of your subject will
determine the color of the screen you will use (blue or green).
It is important to set things up so that there is a well-defined, sharp
separattion between the subject and blue background.
Make sure your subject is in focus. If it is not, you will get a
blurry outline. Also be wary of fast movements which may cause
motion blur. If your subject will be moving quickly, consider
using a higher shutter speed. It is not impossible to extract a
good mask from a blurred subject, but it is harder.
If you are able to set up lighting for the subject, do so. When
lighting, make sure that the background blue surface is uniformly lit,
avoiding shadows if possible. If necessary, shadows can be
avoided or moved away from the subject by moving the blue screen
farther back. Also, consider rim-lighting the subject, so that
there is a bright outline which stands out from the background. A
yellow rim-light against a blue background is quite effective.
|